


Get started with physical computing with Raspberry Pi with the Cytron Maker pHAT:
Looking to use a Pi to control things and would like to see what is happening in real-time? If that’s the case this product is for you. It gives you access to pins to drive your devices, complete with lights so you can see what is happening and also has three switches for inputs and a buzzer. The LEDs show you which pins are active and how long they remain active, great for both teaching and troubleshooting.
The Maker pHAT: for Raspberry Pi is an education-friendly mini HAT, featuring a handy USB to serial module that has been specifically designed to make it simple for the new user/student to get started with physical computing with Raspberry Pi.
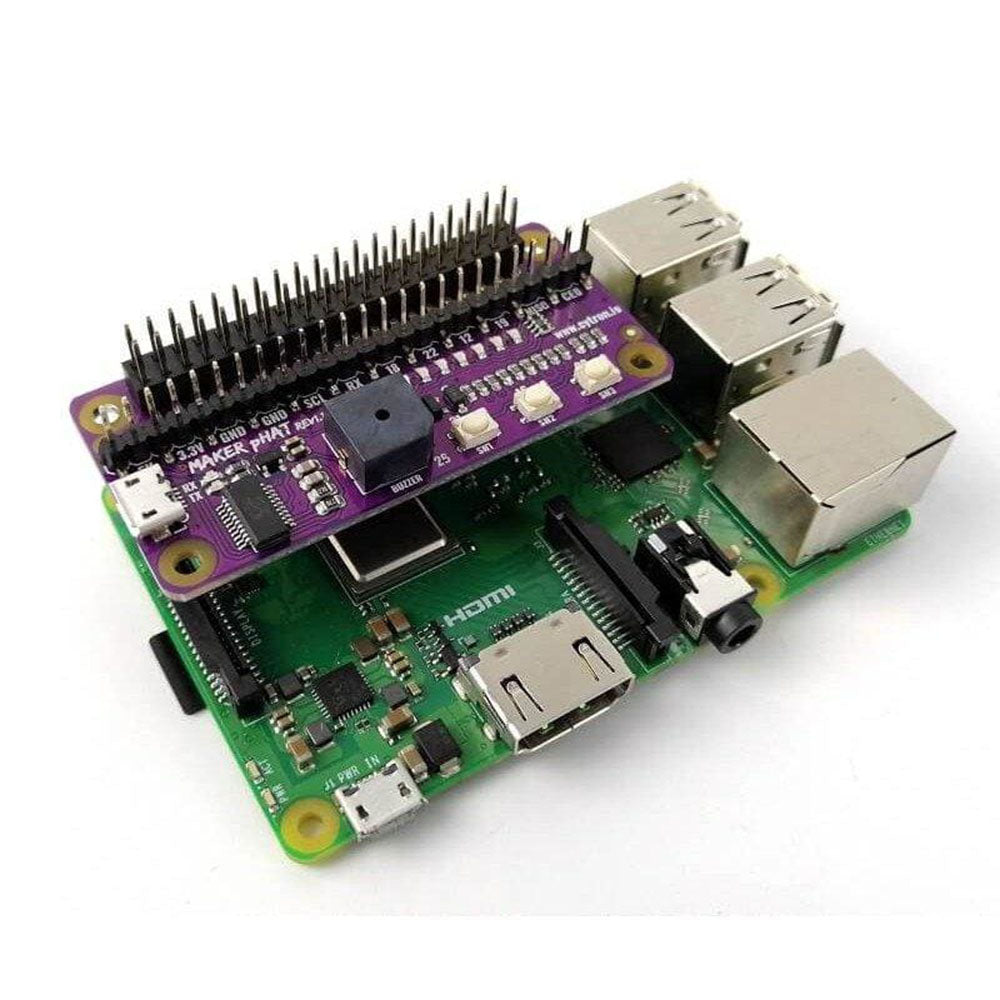
The Maker pHAT: conforms to the standard Raspberry Pi GPIO footprint. This makes it compatible with standard-sized Raspberry Pi boards (Pi 3B/3B+/4B 1GB/4B 2GB/4B 4GB), the medium-sized Raspberry Pi 3A+ and smaller size Raspberry Pi Zero/W/WH. The Maker pHAT board is Raspberry Pi Zero size and stacks perfectly on Pi Zero computers.
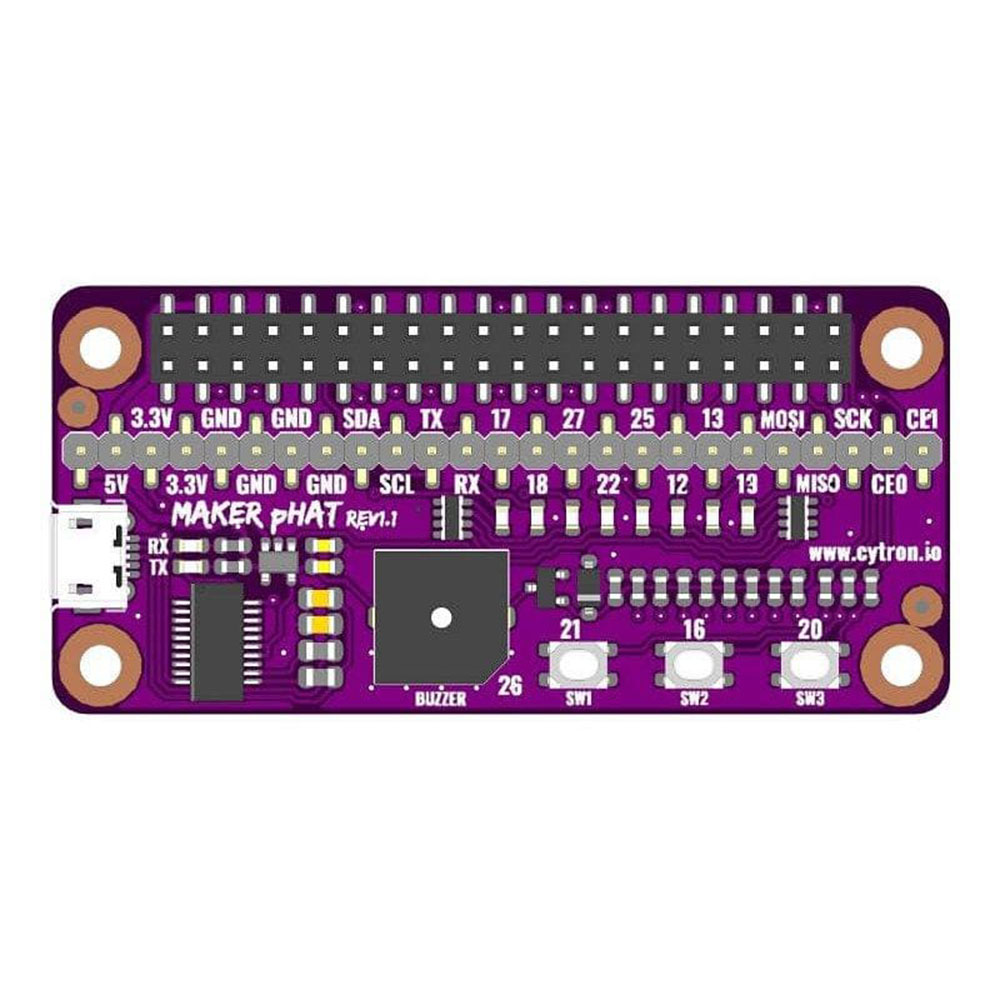
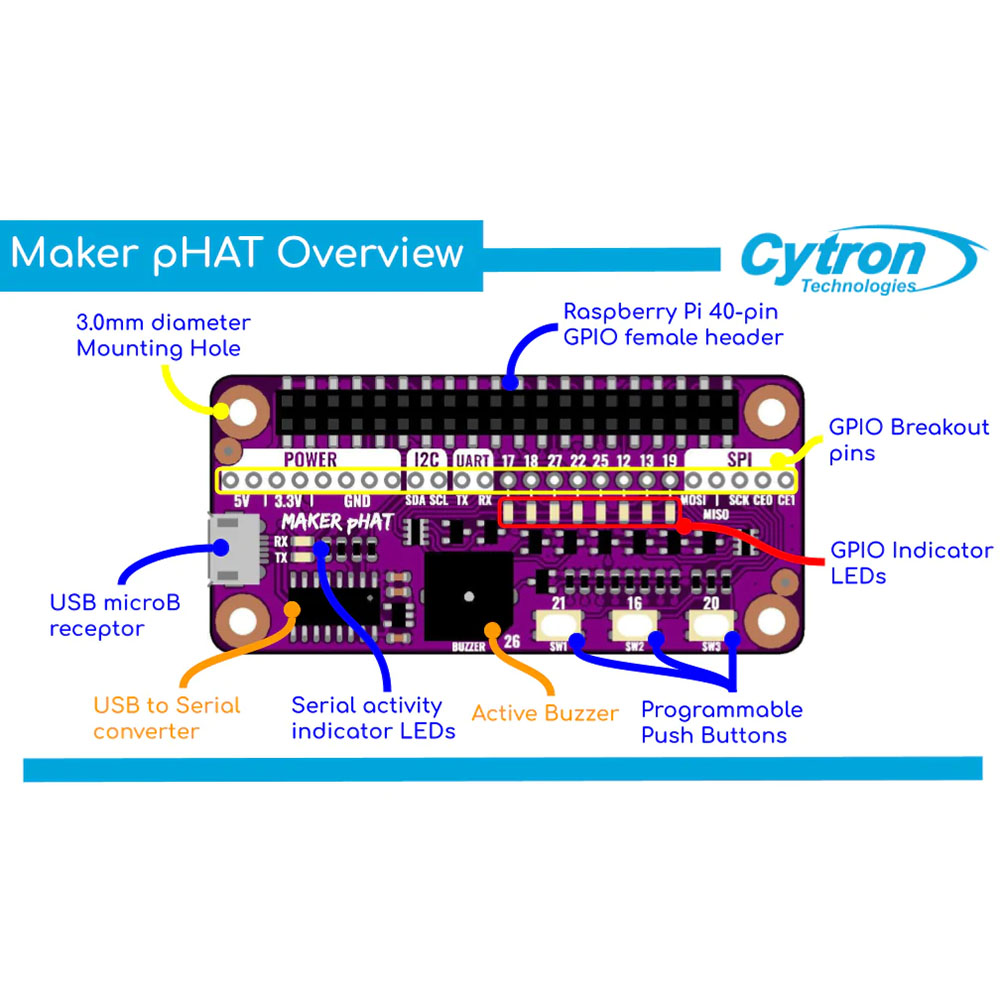
The board features an LED array for selected GPIO pins; GPIO 17, 18, 27, 22, 25, 12, 13, and 19. Additionally, there are also 3 x programmable push buttons (GPIO 21, 19 and 20, need to configure as input pull-up) and an onboard active buzzer (GPIO 26). For ease of use, all GPIO has been fully labelled, this includes; SPI, UART, I2C, 5V, 3.3V, and GND.
The board requires 5V and is powered via the USB connector. It can be powered by a computer USB port, power bank, or standard USB adapter.
- How to get started without additional devices (monitor, keyboard, and mouse). Beginners will either need to use additional devices or follow many steps just to get started. This may confuse them. For techies that want to know why this is because it lacks an onboard USB to UART communication for your computer to get the IP address for SSH (headless), or to kick-start configuration directly.
- How to get started with electronics. It doesn’t come with any inputs or outputs, you will need to connect additional accessories to use it. Most beginners do not have basic knowledge of electronics. They will have a problem to understand the circuit diagram and connections needed when they first started learning. They will spend a substantial amount of time just connecting the wires and troubleshooting the connections.
- How to troubleshoot the GPIO. With just the Raspberry Pi, beginners face a common problem when learning electronics- difficulty in troubleshooting their circuits. This is because when it doesn’t work, we do not know whether the problem is due to wire connection or coding.
- How to access the GPIO. Because the pins are not labelled, you need to search online to get the designated pin and know which pin to connect. For beginners, this definitely will make it harder for them to make the connection correctly.
- No easy way to properly shut down using a switch. There is no programmable push button to enable proper shutdown through hardware. If the beginner turns off the power without properly shutting it down, the Raspberry Pi may not work the next time.
- Simplify getting started with Raspberry Pi without an additional monitor, keyboard or mouse (Headless). Go headless with a few simple steps as it enables users to remote access Raspberry Pi through serial.
- Simplify learning electronics. Beginners can skip the hassle of constructing the basic electronic circuit. Although it is equally important for them to learn about basic electronics, it can always come later after they have experienced how easy it is to create an awesome project. Start with fun and excitement. Start coding right away and see your board lights up and plays sound with the press of a button. It comes with onboard LEDs, pushbuttons, and a buzzer to easily learn how to control input and output. No messy wiring needed and no additional components needed.
- Simplify troubleshooting and prototyping. Not only do the onboard LEDs work as outputs, but they can also act as indicators, clearly showing what’s happening on that pin. When the pin is used as input, you can clearly see whether the signal is received by just looking at changes on the LEDs. The pre-soldered header pins come with nice labels. This helps the user to easily connect inputs and outputs to the right pins. This will further assist them in interfacing with sensors and actuators.
- Simplify proper shutdown using pushbutton. You can easily follow the steps and choose one of the pushbuttons as the power button to properly shutdown the Raspberry Pi. Just press the button and it will shut down.
Note:
- A Raspberry Pi is not included but can be purchased separately.
Features:
- The Maker pHAT: for Raspberry Pi is an education-friendly mini HAT.
- Compatible with standard size Raspberry Pi 3B/3B+/4B 1GB/4B 2GB/4B 4GB, medium size Raspberry Pi 3A+ and smaller size Raspberry Pi Zero/W/WH.
- Raspberry Pi Zero size, stacks perfectly on to Pi Zero computers
- Standard Raspberry Pi GPIO footprint.
- LED array for selected GPIO pins (GPIO 17, 18, 27, 22, 25, 12, 13, 19).
- 3 x onboard programmable buttons (GPIO 21, 19 and 20, need to configure as input pull-up).
- Onboard active buzzer (GPIO 26).
- Full labelling of GPIOs, including SPI, UART, I2C, 5V, 3.3V, and GND.
- Utilize USB Micro-B socket for 5V input and USB to UART communication.
- USB serial facilitated by the CH340, Rev1.10 uses FT231X as the USB to UART.
- Input voltage: USB 5V, from the computer, power bank or standard USB adapter.
Contents:
- 1 x Cytron Maker pHAT: Simplifying Raspberry Pi for {Education}.
- 2 x 20 Stacking Headers.
Dimensions:
- Length: 65mm.
- Width: 30mm.
- Height: 5mm.
Video:
Requires:
- Optional Power supply:
- USB Lead. Or lead plus power supply.
- Compatible Raspberry Pi boards:
- Raspberry Pi Zero V1.3 (Will need to solder 2 x 20 header pin).
- Raspberry Pi Zero W (Will need t solder 2 x2 0 header pin).
- Raspberry Pi Zero WH (Ready for plug and use)
- Raspberry Pi 1 Model A+ (Will need 2 x 20 stacking header)
- Raspberry Pi 3 Model A+ (Will need 2 x 20 stacking header)
- Raspberry Pi 3 Model B (Will need 2 x 20 stacking header)
- Raspberry Pi 3 Model B+ (Will need 2 x 20 stacking header)
- Raspberry Pi 4 Model B 1GB (Will need 2 x 20 stacking header)
- Raspberry Pi 4 Model B 2GB (Will need 2 x 20 stacking header)
- Raspberry Pi 4 Model B 4GB (Will need 2 x 20 stacking header)
Resources
- User’s Manual
- Schematic Rev1.00 (pdf)
- Schematic Rev1.10 (pdf)
- Sample Python Code (Github)
- CH340 Driver (Windows)
- CH340 Driver (MacOS)
- CH340 Driver (Linux) – Pre-installed
- FT231X Driver on Rev1.10 (Windows, Linux, and macOS)
- PuTTY – For serial terminal
- Raspberry Pi: Mengawal LED di Maker pHAT


Reviews
There are no reviews yet.